One of my resolutions for the year was to stop using Clojure and to focus more on technology I can use for my daily business at work. I even skipped :clojureD 2020, because I was determined to explore different technologies. Well, I failed. I started a small pet project in Clojure, again (and I hope I can share it with you in some time), and I am guilty of having lots of fun working on it. On of the pet projects goals was to write a “Cloud Ready” application, which can be deployed to several cloud providers without much adjustment and without manual configuration. In this blog series, I want to outline some of the steps I took, libraries I used and results I achieved with it.
The application
We will develop an application, which allows us to log in with google, create a user profile, and look at the user profiles of others. You could call it a public, virtual scrapbook of sorts.
Creating the application foundation
I decided to use boot-clj as a build framework, as it is the most flexible. One of boots big disadvantages is its name, which is quite hard to search for online ;) We will later make use of boots tasks to set up our development environment with docker, but for now we will just use it for dependency management, building and testing the application. On a Mac, you can install boot via brew install boot-clj
First we want to initialize a base for our app, so that we don’t have to create all files, folders and settings by ourselves. We create the frame for our appliction with the name “scrapbook” boot -d boot/new new -t app -n scrapbook. The structure of our app then looks like this:
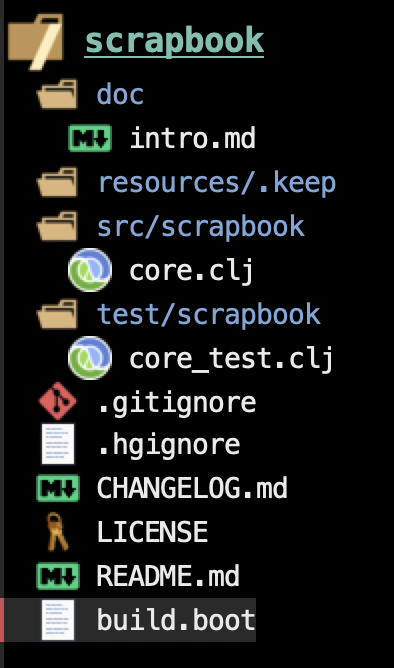
Boot created a folder for documentation, one for resources, one for sources and one four our test sources, and filled some of them with example files. It also created a .gitignore file for us already, some Markdown files for further documentation and one file containing the license.
Our build definition is stored in the file build.bootin the projects root directory, and it looks like this:
(def project 'scrapbook)
(def version "0.1.0-SNAPSHOT")

(set-env! :resource-paths #{"resources" "src"}
          :source-paths   #{"test"}
          :dependencies   '[[org.clojure/clojure "RELEASE"]
                            [adzerk/boot-test "RELEASE" :scope "test"]])

(task-options!
 aot {:namespace   #{'scrapbook.core}}
 pom {:project     project
      :version     version
      :description "FIXME: write description"
      :url         "http://example/FIXME"
      :scm         {:url "https://github.com/yourname/scrapbook"}
      :license     {"Eclipse Public License"
                    "http://www.eclipse.org/legal/epl-v10.html"}}
 repl {:init-ns    'scrapbook.core}
 jar {:main        'scrapbook.core
      :file        (str "scrapbook-" version "-standalone.jar")})

(deftask build
  "Build the project locally as a JAR."
  [d dir PATH #{str} "the set of directories to write to (target)."]
  (let [dir (if (seq dir) dir #{"target"})]
    (comp (aot) (pom) (uber) (jar) (target :dir dir))))

(deftask run
  "Run the project."
  [a args ARG [str] "the arguments for the application."]
  (with-pass-thru fs
    (require '[scrapbook.core :as app])
    (apply (resolve 'app/-main) args)))

(require '[adzerk.boot-test :refer [test]])
The buildfile itself is Clojure code, so we don’t have to define the project in some kind of markup language. We can leverage Clojures full power to build our software ;) I don’t want to get into too much detail on the file, but point out the parts which are important to us right now:
- The
:dependenciessection obviously defines our dependencies. In the initial project setup, the only dependencies are Clojure itself and the boot-test suite - The
task-optionssection defines the name, version, license and metadata of our project - Tasks are created with the
deftaskmacro. They can be called from the command line. E.g.boot build, executed on the terminal, will build the project,boot run, will run it - In the end, an existing boot task is pulled into our namespace and referred as
test. It can be called with the commandboot test, and will run our unit test suite.
Setting up a web server
Our goal is to write a web application, so we need to add some dependencies which will serve our content via HTTP. Ring is a very versatile web library for Clojure, and I decided to build the application with Ring as a basis. The first step is to add the ring dependency to our build.boot file. While we are at it, we should replace the “RELEASE” dependencies from the template with definite versions, so the dependencies section will look like this:
(set-env! :resource-paths #{"resources" "src"}
          :source-paths   #{"test"}
          :dependencies   '[[org.clojure/clojure "1.10.0"]
                            [adzerk/boot-test "1.2.0" :scope "test"]
                            [ring "1.8.0"]])
We need to start the ring server in our appliction code. Modify the file core.clj so that it looks like this:
(ns scrapbook.core
  (:require [ring.adapter.jetty :refer [run-jetty]])
  (:gen-class))

(defn app-handler [request]
 {:status 200
  :headers {"Content-Type" "text/html"}
  :body "Yoo-hoo, Mr. Tentacle guy ? I don't feel so good..."})

(defn -main
  "Starts the web server and the application"
  [& args]
  (run-jetty app-handler {:port 80}))
We :require Rings Jetty Adapter in the ns definition, and start Jetty with the function run-jetty. It’s parameters are a function taking one request parameter and a map of options. We provide the function app-handler which we wrote above, and define in the options that Jetty should run on port 80. The app-handler function needs to return a map containing the HTTP Status and can return a map of headers and the body content. When we start the appliction with the command boot run and open the url http://localhost:80 in our browser, the text “Yoo-hoo, Mr. Tentacle guy ? I don’t feel so good…” is displayed.
Rendering HTML on the server
Of course we don’t want to output simple strings to our users, we want to display a nice looking website, with HTML and CSS. We could write our HTML templates from hand, but there is a better approach. The most common library for HTML templating is Hiccup, but in this case I decided to use Rum instead. Rum is mainly a library to create frontends based on react, but its serverside rendering capabilities are impressive, too, and it is quite fast, also. We need to add the dependency for rum to our buildfile: [rum "0.11.4"] and require the macro defc and the function render-static-markup from the library in core.clj.
(ns scrapbook.core
  (:require [ring.adapter.jetty :refer [run-jetty]]
            [rum.core :refer [defc render-static-markup]])
  (:gen-class))
Rum uses a hiccup-like syntax. We are able to define our websites structure with vectors and maps, while the leading keyword in a vector defines the type of html component we want to use. [:h1 "Hey there] will be translated to <h1>Hey there</h1>. If the second element in the vector is a map, the entries will be interpreted as attributes of that HTML element. As an example,
[:div {:id "my-div"
       :class "content"}
  "Hey there"]
will be translated with the function render-static-markup to
<div id="my-div" class="content">Hey there</div>
The markdown can also be nested. The defc macro defines a function which returns a rum component:
(defc header-div []
  [:div
    [:h1 "This is a header"]
    [:p "This is a paragraph"]
If we want to implement a basic greeting app, our code might look like this:
(ns scrapbook.core
  (:require [ring.adapter.jetty :refer [run-jetty]]
            [rum.core :refer [defc render-static-markup]])
  (:gen-class))

(defc html-frame []
  [:html
   [:head
    [:title "A Scrapbook"]]
   [:body
    [:h1 {:id "main-headline"}
     "Welcome to Scrapbook, Stranger!"]
    [:div {:id "main-content"}
     "We hope you will like it here"]]])

(defn app-handler [request]
  {:status 200
   :headers {"Content-Type" "text/html"}
   :body (render-static-markup (html-frame))})

(defn -main
  "Starts the web server and the application"
  [& args]
  (run-jetty app-handler {:port 80}))
This is 25 lines of code for our first web app, and 9 of them are used for the HTML template. Not bad for the start ;)
Keep posted for the series to be continued, soon.